QEMU custom peripheral properties
- 02 Aug, 2025

In the QEMU TMP105 QMP interaction newsletter the interaction with an emulated QEMU component via QMP and properties was shown. Using Python and QMP it was possible to change the temperature that the TMP105 component reported by issuing commands from outside the QEMU emulation.
In this post we will add similar support to the Custom I2C and
Custom SPI peripherals. In the original implementation of these custom components
random values were returned every time the TEMPERATURE register was read.
The updated custom peripherals will have a temperature property that can be manipulated (read and written) from
outside the QEMU emulation using QMP protocol.
Additionaly, a PyQt6 application will be developed that provides controls for interactively changing values of
temperature properties for both I2C and SPI components.
The following items will be covered
QEMU custom components updates
As mentioned in the introduction, the plan is to update both I2C and SPI custom peripherals. Since the design of
peripherals is similar (CONFIG, STATUS and TEMPERATURE registers only), the modifications that will be required
will also be similar.
If we look back at the implementation of TMP105 peripheral, two things stand out that made it possible to interact with it and modify the property
- It has an internal variable for storing current temperature value, and a property to provide controlled access to that variable
- In order to simplify access to the TMP105 we set and
idfor it when QEMU was invoked
We will need to do something similar for the custom components in order to provide a way to update value during runtime.
Note
Code examples only for the I2C component will be shown but similar applies to the SPI component. Complete changes are available in the QEMU custom components repository.
The patches for the I2C and SPI peripherals with original behavior, using random values instead of property, are in the random-values branch.
The temperature property
A variable to hold current temperature value needs to be added to the component definition and to the VMSTATE for both
components.
/* A simple I2C slave which returns values of ID or CNT register. */
typedef struct I2CSensor {
    /*< private >*/
    I2CSlave i2c;
    /*< public >*/
    uint8_t regs[NR_REGS];      // peripheral registers
    uint8_t count;          // counter used for tx/rx
    uint8_t ptr;            // current register index
    uint8_t temperature;    // temperature as 7.1 fixed point
} I2CSensor;

...

static const VMStateDescription vmstate_i2c_sens = {
    .name = TYPE_I2C_SENS,
    .version_id = 1,
    .fields = (VMStateField[]) {
        VMSTATE_UINT8_ARRAY(regs, I2CSensor, NR_REGS),
        VMSTATE_UINT8(count, I2CSensor),
        VMSTATE_UINT8(ptr, I2CSensor),
        VMSTATE_UINT8(temperature, I2CSensor),
        VMSTATE_END_OF_LIST()
    }
};
After variable is added, property is defined in the init function. The property definition includes setting the name,
type of data that is used, and getter and setter functions.
    object_property_add(obj, "temperature", "uint16",
                        i2c_sens_get_temperature,
                        i2c_sens_set_temperature, NULL, NULL);
In case of both I2C and SPI peripherals, we want to allow setting temperature in the range from 0 to 127.5 degrees and
the simplest way is to allow writing an integer with resolution of 1/10th of a degree. The setter function will convert
that value into the 7.1 fixed point representation that corresponds to the TEMPERATURE register definition. The getter
function will perform conversion in the other way.
Tip
For example, the temperature of 25 degrees would be set from the qom-set by writing value 250 and that would be
represented as 0x32 in the TEMPERATURE register
static void i2c_sens_get_temperature(Object *obj, Visitor *v, const char *name,
                                   void *opaque, Error **errp)
{
    I2CSensor *s = I2C_SENS(obj);
    uint16_t value = (s->temperature * 10) >> 1;

    visit_type_uint16(v, name, &value, errp);
}

/*
 * s->temperature is 7.1 fixed point and value that is received is in 0.1 degree.
 */
static void i2c_sens_set_temperature(Object *obj, Visitor *v, const char *name,
                                   void *opaque, Error **errp)
{
    I2CSensor *s = I2C_SENS(obj);
    uint16_t temp;

    if (!visit_type_uint16(v, name, &temp, errp)) {
        return;
    }
    if (temp > 1275) {
        error_setg(errp, "value %d.%01d C is out of range", temp / 10, temp % 10);
        return;
    }

    s->temperature = (uint8_t) ((temp << 1) / 10);
}
Setting object ID
In the TMP105 example, we passed the ID when invoking QEMU since that is how we created and attached the TMP105 peripheral.
-device tmp105,id=sensor,address=0x50Similar can be done for the I2C sens peripheral, as it can also be integrated that way (by passing the following
argument to the QEMU -device mistra.i2csens,id=i2csens,address=0x36).
However, the same is not possible for the SPI sensor component, since CS pin cannot be connected that way. Therefore,
we need to do the ID tie-up inside the code.
Info
For educational purposes we will do the same for both I2C and SPI peripherals, connecting from the code as custom peripherals are currently integrated in that way.
From the code, the ID can be assigned to a device using the qdev_set_id function. The function requires a pointer to a
device and string for the ID to be passed.
g_autofree char *i2cid = g_strdup("i2csens");
i2csensdev = DEVICE(i2c_slave_new("mistra.i2csens", 0x36));
qdev_set_id(i2csensdev, i2cid, &err);
i2c_slave_realize_and_unref(I2C_SLAVE(i2csensdev), i2c, &err);
PyQt6 application
In order to have a more interactive example, a PyQt6 application is made to provide knobs to change I2C and SPI sens
temperature property.
Tip
The source code for the PyQt6 application can be found in the GitHub repo.
PyQt6 requirements
The QMP (qemu.qmp module) requires async functionality, but PyQt6 does not support it out of the box. In order to
enable integration of PyQt6 and async code, we will use the qasync module. The qasync module will allow Qt6 signals
and slots to support async attributes.
Together with the PyQt6 module, all three dependencies can be installed using pip3.
pip3 install PyQt6 qasync qemu.qmpTip
Suggestion is to use a virtual environment and the provided requirements.txt file in the
repository, so installation would be performed using
python3 -m venv venv
. ./venv/bin/activate
pip3 install -r requirements.txt
App design
The application provides few control knobs to interact with the running QEMU instance:
- the “Connect” button to establish connection to the QEMU
- two sliders (one for I2C and the other for SPI) for setting the temperature and labels to show the current temperatures that are configured
First, the “Connect” button has to be pressed in order to open the QMP connection to the QEMU. Before the “Connect” button is pressed the sliders are disabled, so values cannot be changed.
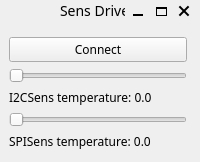
Note
QEMU should be started before “Connect” button is pressed, since PyQt6 application will expect that the QMP socket file is present.
After pressing the “Connect” button the sliders will be enabled and values can be changed. Moving the sliders will show the current value.
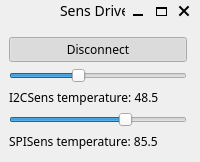
After the testing is done, pressing the “Disconnect” button will disconnect from QEMU.
Testing
Once QEMU and PyQt6 applications are started, we can connect from PyQt6 application and change the temperature values for the I2C and SPI sensor components.
Inside QEMU we can use the Rust application to show current values read from inside QEMU.
The testing results are shown in the video below
Summary
The QMP can be a very powerful tool to make the custom components more interactive. With this change, custom components that were made can be tested more thoroughly.
Note
One thing to note is that it is not necessary to set the ID of the peripheral. It is more convenient, since then we
can access it using the ID, but it is not required. In the qom-list the components without ID are listed under path
/machine/unattached/ with names device[i] and they all have a property type with the QEMU object name (like
mistra.i2csens or tmp105).
Therefore, it is possible to iterate over devices from the Python application and dynamically find the desired peripheral instead of modifying code to add the ID.