Mongoose webserver as UI for QEMU custom peripherals
- 22 Feb, 2026

In the previous posts on Custom QEMU peripherals (Memory-mapped, I2C, SPI) the validation of peripheral functionality was done using a CLI (Command Line Interface) application, developed in C++ or Rust.
Using a CLI application is a straightforward way to get started and perform basic testing. It provides a simple way to visualise the latest measured or received data directly from the terminal. This is very useful during development and for prototyping.
However, for real-world applications monitoring the latest measured data is not always enough. Sometimes trends and development over time of the measured variable carry more information than the current value.
In those cases, it is useful if the data can be visualized in a graphical way, using a graph or set of graphs. For more features, a dashboard can be employed, so also some control (like enabling/disabling certain control option) can be implemented.
Depending on the system capabilities, the data can be displayed in different ways:
- if the system has a built-in display, different UI frameworks (like Qt or Slint or many others) can be used to make a graphical application that will show measured data in real-time;
- if there is a cloud infrastructure available, the edge device can push the data to the cloud, and it can be visualized later in different ways;
- if there is local web interface available, the dashboards can be hosted on the device itself.
In this blog post the focus will be on the last option, where Mongoose webserver will be used to control and visualize the output of the custom QEMU peripherals. The following items will be covered
Mongoose web server
The Mongoose web server was previously mentioned when SWUpdate was used for device firmware update.
Mongoose embedded web server is lightweight, standalone and can be used on variuos microcontrollers. However, it can also be used on regular PCs since it can run under standard operating system.
One of the nice features is the Web UI builder, a no-code wizard which allows creating the dashboard UI in just a few clicks. The wizard provides drag-and-drop interface for arranging the dasbhoard look and supports configuring different parameters of the dashboard.
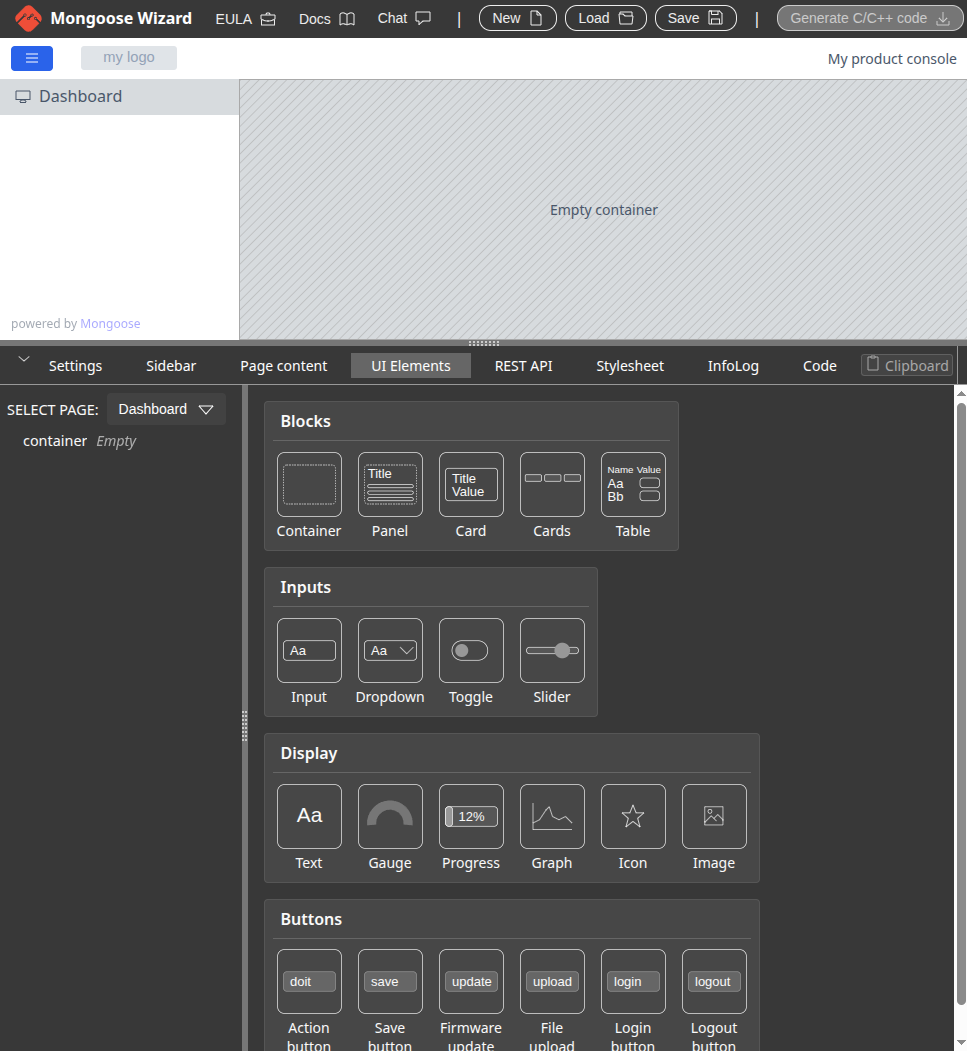
The wizard also provides interface for configuring the REST API endpoints for data exchange, as well as configuring different protocol support: websockets, MQTT client with firmware OTA (mostly intended for microcontrollers), DNS, SNTP, Modbus-TCP, etc. Finally, once UI is created in the wizard and configured, the “Generate C/C++ code” button can be used to generate the C Makefile project.
Application development
In this post, the application development will be done in two parts:
-
use of Mongoose wizard UI to make the dashboard UI
- after design is finished, C code skeleton can be generated
-
implementation of functions that interact with the sysfs attributes of the implemented drivers for custom QEMU peripherals
Wizard UI creation
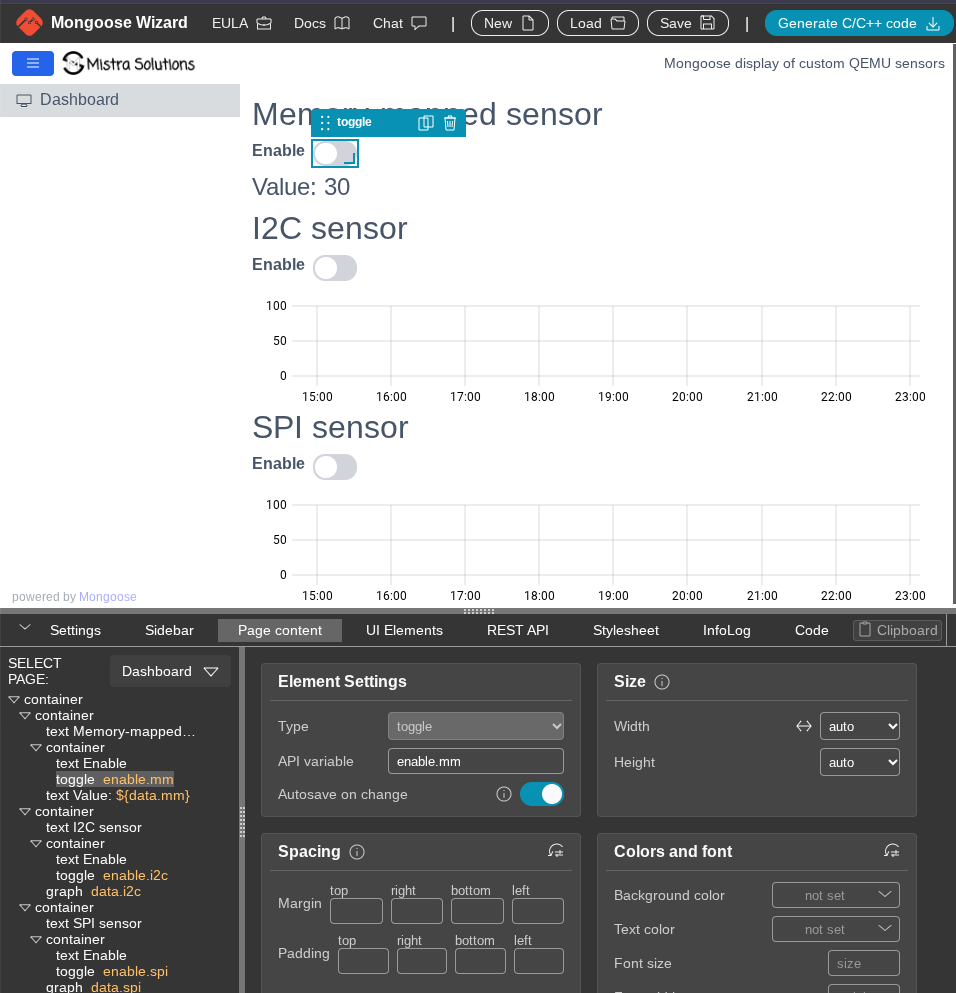
The drivers for the custom QEMU peripherals all provide interfaces for enabling/disabling functionality and reading the data that the peripherals provide.
Therefore, the UI should provide a way to control if peripheral is enabled and have a way to display the obtained data.
Besides the current value, for the I2C and SPI peripherals it can be interesting to provide a way to observe value development over time, so graphs will also be used.
In the REST API the data definition for enable and for data endpoints is configured.
The enable endpoint will support three boolean values to indicate if peripheral output for Memory-mapped, I2C and SPI is enabled.
For the data endpoint, the output of the Memory-mapped peripheral will be an integer and for I2C and SPI peripheral a double. This also means that the value read from sysfs needs to be converted before it is sent to the UI.
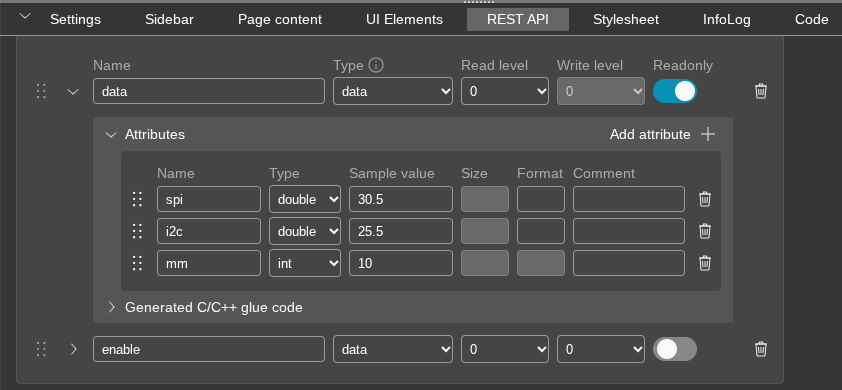
From other features, the websocket is also enabled, so data values can be pushed periodically to the UI.
Once the UI is done, the “Generate C/C++ code” button can be used to generate the code skeleton.
Generated code
The generated code provides all functions required by Mongoose to be able to serve the designed UI and glue functions with sample data so project can be built from the start.
│.
│├── hal.h
│├── LICENSE
│├── main.c
│├── Makefile
│├── mongoose
││   ├── mongoose.c
││   ├── mongoose_fs.c
││   ├── mongoose_glue.c
││   ├── mongoose_glue.h
││   ├── mongoose.h
││   ├── mongoose_hal.h
││   ├── mongoose_impl.c
││   └── mongoose_wizard.json
│└── README.md
All files required by Mongoose are in the mongoose directory. The main.c contains just the basic initialization
- main.c
// SPDX-FileCopyrightText: 2024 Cesanta Software Limited
// SPDX-License-Identifier: GPL-2.0-only or commercial
// Generated by Mongoose Wizard, https://mongoose.ws/wizard/

#include "hal.h"
#include "mongoose/mongoose_glue.h"

int main(void) {
  // Cross-platform hardware init
  hal_init();
  MG_INFO(("HAL initialised, starting firmware..."));

  // This blocks forever. Call it at the end of main(), or in a
  // separate RTOS task. Give that task 8k stack space.
  mongoose_init();

  for (;;) {
    mongoose_poll();
  }

  return 0;
}// SPDX-FileCopyrightText: 2024 Cesanta Software Limited
// SPDX-License-Identifier: GPL-2.0-only or commercial
// Generated by Mongoose Wizard, https://mongoose.ws/wizard/
#include "hal.h"
#include "mongoose/mongoose_glue.h"
int main(void) {
// Cross-platform hardware init
hal_init();
MG_INFO(("HAL initialised, starting firmware..."));
// This blocks forever. Call it at the end of main(), or in a
// separate RTOS task. Give that task 8k stack space.
mongoose_init();
for (;;) {
mongoose_poll();
}
return 0;
}The glue functions just use the sample values that were provided in the wizard UI for the REST API structures
- mongoose/mongoose_glue.c
// SPDX-FileCopyrightText: 2024 Cesanta Software Limited
// SPDX-License-Identifier: GPL-2.0-only or commercial
// Generated by Mongoose Wizard, https://mongoose.ws/wizard/

// Default mock implementation of the API callbacks

#include "mongoose_glue.h"
static struct data s_data = {30.5, 25.5, 10};
void glue_get_data(struct data *data) {
  *data = s_data;  // Sync with your device
}

static struct enable s_enable = {false, false, false};
void glue_get_enable(struct enable *data) {
  *data = s_enable;  // Sync with your device
}
void glue_set_enable(struct enable *data) {
  s_enable = *data; // Sync with your device
}// SPDX-FileCopyrightText: 2024 Cesanta Software Limited
// SPDX-License-Identifier: GPL-2.0-only or commercial
// Generated by Mongoose Wizard, https://mongoose.ws/wizard/
// Default mock implementation of the API callbacks
#include "mongoose_glue.h"
static struct data s_data = {30.5, 25.5, 10};
void glue_get_data(struct data *data) {
*data = s_data; // Sync with your device
}
static struct enable s_enable = {false, false, false};
void glue_get_enable(struct enable *data) {
*data = s_enable; // Sync with your device
}
void glue_set_enable(struct enable *data) {
s_enable = *data; // Sync with your device
}Instead of editing the glue files, a new pair of header and source files, sens.h and sens.c is added. The main
functionality that is needed is reading from and writing to sysfs files, or to be more precise, reading and writing
integer values.
As in the glue files, the sens.c has functions to get the data (it is read-only) and to set and get enable values
void sens_get_data(struct data *data) {
  struct data s_data = {.i2c = 127500, .spi = 127500, .mm = 0};
  bool valid = false;
  int value = 0;

  printf("Called get data\n");

  // Read I2C data
  valid = read_int_sysfs("/sys/bus/i2c/devices/1-0036/data", &value);
  if (valid) {
    s_data.i2c = value / 1000.;
  }
  // Read SPI data
  valid = read_int_sysfs("/sys/bus/spi/devices/spi0.0/data", &value);
  if (valid) {
    s_data.spi = value / 1000.;
  }
  // Read MMsens data
  valid = read_int_sysfs("/sys/class/mmsens/mmsens0/data", &value);
  if (valid) {
    s_data.mm = value;
  }

  *data = s_data;
}

//----------------------------------------------------------------------------------

void sens_get_enable(struct enable *data) {
  data->i2c = read_enable_sysfs("/sys/bus/i2c/devices/1-0036/enable");
  data->spi = read_enable_sysfs("/sys/bus/spi/devices/spi0.0/enable");
  data->mm = read_enable_sysfs("/sys/class/mmsens/mmsens0/enable");
}

//----------------------------------------------------------------------------------

void sens_set_enable(struct enable *data) {
  write_enable_sysfs("/sys/bus/i2c/devices/1-0036/enable", data->i2c);
  write_enable_sysfs("/sys/bus/spi/devices/spi0.0/enable", data->spi);
  write_enable_sysfs("/sys/class/mmsens/mmsens0/enable", data->mm);
}
These functions are integrated in the main.c so they are used instead of the default glue functions. Also, the
websocket connection is made to data read is done on every websocket update.
  mongoose_set_http_handlers("data", sens_get_data, NULL);
  mongoose_add_ws_reporter(1000, "data");
  mongoose_set_http_handlers("enable", sens_get_enable, sens_set_enable);
Tip
The code for the app can be found in the straxy/sens-app-mongoose repository
Testing
The testing will be done on the Cubieboard-NG QEMU model. In order to be able to test the application, it needs to be compiled and deployed to the SD card.
One option is to use a prebuilt toolchain (arm-none-linux-gnueabihf-gcc), or toolchain from Yocto SDK.
In this post we will integrate the application code into Yocto, so the application is embedded with the image.
Yocto configuration
In order to integrate the app, a following recipe is added to the Yocto configuration.
- sens-app-mongoose.bb
DESCRIPTION = "Mongoose web server dashboard application"
LICENSE = "MIT"
LIC_FILES_CHKSUM = "file://LICENSE;md5=ed27a14fac2791e45d0709edc3443ab8"

FILESEXTRAPATHS:prepend = "${THISDIR}/files:"

SRC_URI = "\
    git://github.com/straxy/sens-app-mongoose.git;protocol=https;branch=main \
    file://sens-app-mongoose.service \
"

SRCREV = "${AUTOREV}"

S = "${WORKDIR}/git"

TARGET_CC_ARCH += "${LDFLAGS}"

do_install() {
    # Install executable
    install -d ${D}${bindir}
    install -m 0755 ${S}/firmware ${D}${bindir}/sens-app-mongoose

    # Install service file
    install -d ${D}${systemd_system_unitdir}
    install -m 0644 ${WORKDIR}/sens-app-mongoose.service ${D}${systemd_system_unitdir}/
}

inherit systemd

SYSTEMD_SERVICE:${PN} = "sens-app-mongoose.service"DESCRIPTION = "Mongoose web server dashboard application"
LICENSE = "MIT"
LIC_FILES_CHKSUM = "file://LICENSE;md5=ed27a14fac2791e45d0709edc3443ab8"
FILESEXTRAPATHS:prepend = "${THISDIR}/files:"
SRC_URI = "\
git://github.com/straxy/sens-app-mongoose.git;protocol=https;branch=main \
file://sens-app-mongoose.service \
"
SRCREV = "${AUTOREV}"
S = "${WORKDIR}/git"
TARGET_CC_ARCH += "${LDFLAGS}"
do_install() {
# Install executable
install -d ${D}${bindir}
install -m 0755 ${S}/firmware ${D}${bindir}/sens-app-mongoose
# Install service file
install -d ${D}${systemd_system_unitdir}
install -m 0644 ${WORKDIR}/sens-app-mongoose.service ${D}${systemd_system_unitdir}/
}
inherit systemd
SYSTEMD_SERVICE:${PN} = "sens-app-mongoose.service"In the recipe a systemd service is also added so the sens-app-mongoose application will start automatically on system
boot. The contents of the systemd service file are
- sens-app-mongoose.service
[Unit]
Description=Sensor Application Mongoose
After=network.target

[Service]
Type=simple
ExecStart=/usr/bin/sens-app-mongoose
Restart=on-failure

[Install]
WantedBy=multi-user.target[Unit]
Description=Sensor Application Mongoose
After=network.target
[Service]
Type=simple
ExecStart=/usr/bin/sens-app-mongoose
Restart=on-failure
[Install]
WantedBy=multi-user.targetAfter the recipe is added to the mistra-swupdate image recipe, the build can be started using
bitbake mc::mistra-swupdateRunning the application
Once image is built and passed to QEMU, the application will start on boot and local server will be reachable at 192.168.123.101:8081.
If the PyQt QMP application is also started (outside of QEMU) as well, it can be used to change the data values of I2C and SPI sensors and validate that the values shown in graph change as well.
Summary
Having a nice and simple dashboard to enable control and data visualization for an edge device is very practical.
In this post the Mongoose webserver is explored in such scenario. Using the UI wizard it was straightforward to create a dashboard and define data types that are exchanged. The code generation functionality sets up everything and provides placeholders for the functions that need to be added so the real data is used.
The result is very nice UI that provides both the control for the sensors and display of sensor data, which was the goal. It was easy to integrate Mongoose in the whole Yocto and Embedded Linux experience, and it probably is even more valuable when used in microcontroller environments.